The “map viewer” is the flagship application of my “suite of assistive programs” for players and Judges of Strategic Primer, the strategy game I’m developing. This post is basic user documentation, explaining how to install, launch, and use the map viewer.
Installation
The entire suite, including the map viewer but also all the other “apps,” is packaged as one “app.” You can download it from the repository releases page. If you’re running Windows, look for a filename ending in .exe. If you have a Mac and are comfortable enough with the command line to unpack a tarball, one ending in .app.tbz2 may work for you once you’ve unpacked it, but if it doesn’t or that confuses you, you’ll probably be better off with the .jar. (I do provide a DMG, but I’ve never had a report of that working, so I don’t recommend trying it.) On any other platform, choose the file ending in .jar. Each file name begins with viewer and then includes the version number; you’ll almost always want the latest version.
Put this file wherever you like (unpacking if necessary).
Launching the map viewer
 Because this is a “suite” bundled as if it were a single “app,” when you run the program you will see an “app chooser.” (You can bypass this by running the program from the command line and specifying the “app” you want via an option.) To open the map viewer—the “app” we’re talking about today—click the “Map Viewer” button.
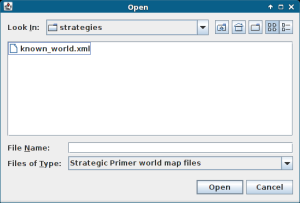
 At this point you’ll be prompted to select the map file to open. (You can bypass this, too, by specifying the file on the command line.) It’ll probably take a few moments to read the file and launch the “app,” so be patient.
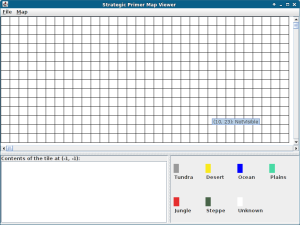
What you’ll see when the map viewer window opens largely depends on what’s in the map described in the file you selected—if it’s a player “known world” map from early in a campaign, you’ll likely see a blank grid in the middle of the window, with an empty box and the “key” or “legend” below, and the menu bar above.
 But the grid is blank merely because the viewer starts with you looking at the upper left corner of the map, and in the first game-year most players haven’t explored the northwest-most one percent of the map. So you’ll probably want to find the explored part of the map.
Moving around the map
Which brings me to the first topic: “moving around the map.” You can change which part of the map you’re looking at in several ways. The first is to use the scroll-bars below and to the right of the map view. You can also scroll up, down, or to the side using the arrow keys or a mouse wheel; this selects a tile adjacent to (or, if you hold Control—or Command on a Mac—down while using an arrow key, five tiles in the specified direction from) the previously selected tile, scrolling the map as necessary to keep the selected tile visible. If you use a mouse wheel, by default it scrolls vertically; holding Shift makes it scroll horizontally. (And holding Control or Command makes it change the zoom level rather than scrolling—which we’ll get to later.)
 If you want to find a specific location whose coordinates (row and column) you know, or a specific “fixture” (fortress, unit, animal, town, etc.) by name, “kind,” or ID number, you can jump directly to it using commands in the “Map” menu. The “Go to Tile” command, which you can also invoke by pressing Control-T (or Command-T on a Mac), opens a dialog window that lets you specify a pair of coordinates (with the location of the current selection filled in), then selects the tile you specify (and scrolls the view to make sure that this selection is visible) when you click “OK” or press Enter. By the way, if you’re lost in the map, holding your mouse over any tile will cause a “tool-tip” indicating its coordinates and tile (terrain) type to pop up.
 Similarly, the “Find a Fixture” command (which has the forward slash,
 /, as its “hot-key”—a legacy of my history with vi) will, once you’ve entered a search term, select and jump to the tile containing the first matching fixture (a fixture matches if its name or “kind” contains the specified string, or if the search term is numeric and the fixture’s ID number is the specified number) “after” the currently selected tile. For example, there’s almost certainly at least one fortress named “HQ” in any given map. By default the program searches across (to the right) and then down, but the dialog window allows the user to change that to search vertically then horizontally, backwards, or both. To search again for the same term, press n, or use the “Find next” command in the menu.
Zooming
Speaking of the “Map” menu, the other two commands it contains have to do with zooming. The zoom level, at this point, only controls how many tiles are visible on the screen at once, and how big they appear to be. While I plan to add a “level of detail” feature at some point in the future, the program doesn’t do any such thing now.
As I mentioned before, scrolling a mouse wheel while pressing Control (or Command on a Mac) zooms in or out. The last two commands in the “Map” menu perform the same function, as do holding Control (or Command) while pressing the plus and minus keys.
Tile Details
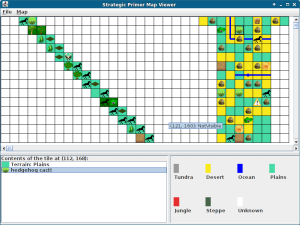
 If you select a tile that isn’t empty, the purpose of the box in the lower left corner of the window becomes apparent: it’s a list of the tile’s contents.
The first item in the list is always the tile’s terrain type (unless that type is “Not Visible”); following that are all the “fixtures” on the tile. If the tile is mountainous, hilly, or forested, those are represented by “fixtures,” as are animals, fortresses, units, towns, meadows, and so on. The list indicates each fixture using an icon and some descriptive text. One of the fixtures on the tile—a unit if there is one, a fortress if not and there’s one of those, or some other fixture—is visible in the map, but all are included in the list.
If you have two windows open—looking at different map files—you can drag a fixture or fixtures (including the pseudo-“fixture” indicating the tile type) from the list in one window to another, and they’ll be added to that window’s currently-selected tile.
You can also remove a fixture from a tile (and from the map) by selecting it in the list and pressing either the ‘delete’ or the ‘backspace’ key.
If you right-click on a fixture in the list that has a name, a “kind,” or an owner (or any combination of these), a pop-up menu will offer to allow you to change any of these; when you select one of the menu items a dialog box will appear to ask for your change. Names and “kinds” can be arbitrary text; you’ll select a new owner from a drop-down list. (Note that this feature is not present in any version currently on the Bitbucket downloads page as of this writing; however, it will be in the next version released, probably in a couple of weeks to accompany my monthly progress report.)
Miscellaneous
The “File” menu is fairly straightforward, containing commands that are by now all but traditional. The “New” command opens a new viewer window displaying an utterly blank map the same size as the current one. The “Load” command prompts you to select a map file, then opens a new viewer window to display it. The “Save” command saves the current map back to the file it was loaded from, while the “Save As” command prompts you for the file to save it to. And the “Close” and “Quit” commands close, respectively, this window and the entire program.
And one last miscellaneous feature that I should mention purely for the sake of completeness is that if you right-click on a tile in the map, a pop-up menu containing all the tile types will appear. If you select one of them, the tile type of the tile in question will be changed to the type you chose.
If you run into any problems, please report them either in the issue tracker or by contacting me directly. If you’d like to contribute to the development of this suite of programs, please get in touch. And if you’d like to join the campaign of Strategic Primer I’m currently running, please contact me; that would be most welcome news.
I intend to continue documenting the major applications in this suite over the coming months.